
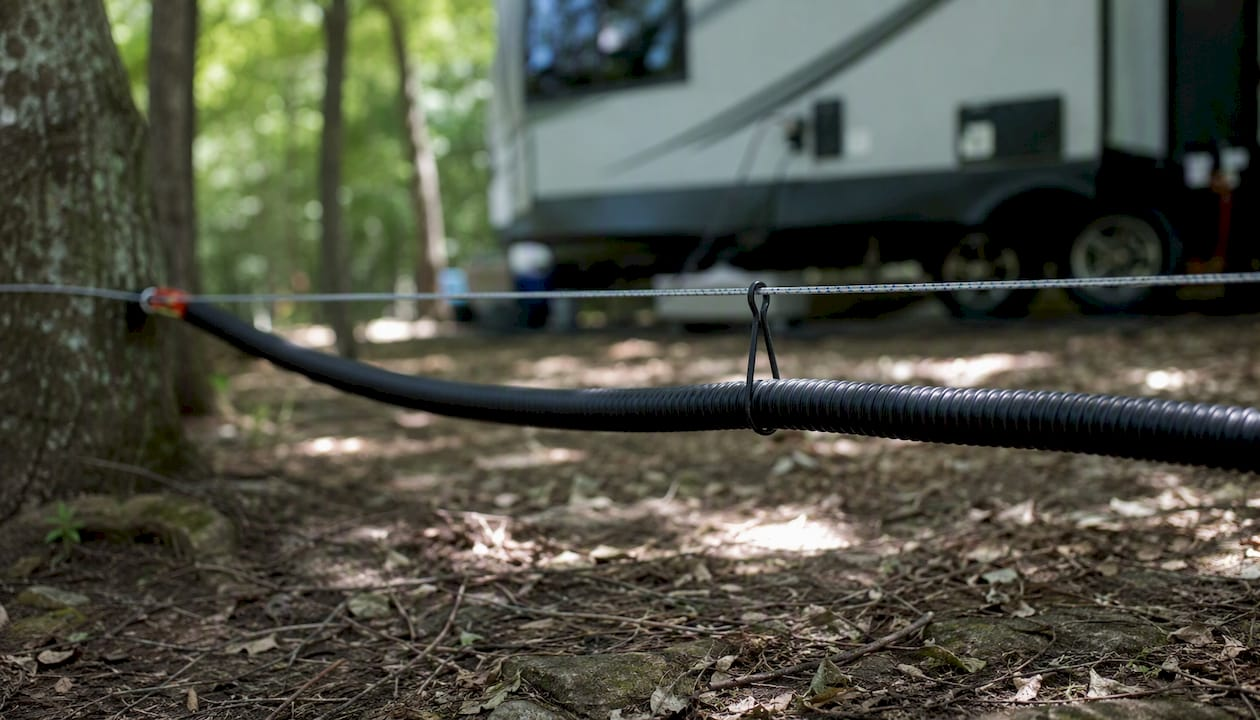
The most reliable ways to support your RV sewer hose without stakes are tension-line suspension, vehicle or clamp-mounted anchors, weighted cradles, and a ready-made no-stake kit like the Levitator, which uses UV-resistant sleeves and a tension line instead of ground hardware. Campers dealing with gravel pads, concrete slabs, or campground rules against stakes have been trading notes on this for years, including a long-running iRV2 forum thread where users compare what actually holds a slope on uneven ground. If you want something you can build tonight, Touring Camper’s PVC cradle guide is the fastest DIY route with materials you can grab at any hardware store.
Here’s how the main options stack up if you need to decide right now:
- Fastest to deploy: a tension-line kit with pre-set clamps, ready in under 10 minutes at most campsites.
- Cheapest DIY build: a PVC cradle cut to length, no tools beyond a saw and a drill.
- Best for steep or gravel pads: a weighted cradle or sandbag system that doesn’t rely on soil at all.
- Best for repeat use across many campsites: a commercial no-stake system built for the job, since it skips the trial-and-error of homemade rigs.
Pro Tip: Test any new setup with a gallon of water before your first real dump. It takes two minutes and tells you immediately whether your slope actually drains or just looks like it does.
Key Takeaways
Sewer hose support without stakes works best when tension carries the load instead of soil, since tension-based systems hold a steady slope across gravel, concrete, and slopes where stakes simply fail.
| Point | Details |
|---|---|
| Slope beats surface type | A steady downhill grade prevents pooling and odor regardless of what the ground is made of. |
| Tension-line wins on hard sites | Gravel and concrete pads need suspension or weighted methods, since stakes can’t penetrate either surface. |
| Retest after settling | Recheck line tension an hour after setup, not just at initial install, since anchor points shift. |
| DIY builds are viable but need upkeep | A PVC cradle or rope tension-line costs under $20 but requires more frequent adjustment than a commercial kit. |
| Levitator offers a ready-made no-stake option | RV Levitator’s tension-line system includes UV-resistant sleeves, universal hose fit, and a money-back guarantee for gravel and sloped sites. |
Table of Contents
- Why Sewer Hose Support Matters (And Why Stakes Aren’t Always an Option)
- What Are the Best No-Stake Support Options?
- How Do You Build a No-Stake Sewer Hose Support?
- How Does the Levitator No-Stake System Work?
- How Do You Keep a No-Stake Hose Flowing Without Odor?
- What Are the Most Common No-Stake Setup Mistakes?
- Which No-Stake Support Should You Choose?
- A Practical Take on What Actually Holds Up at Camp
- Ready to Skip the Trial and Error?
- Frequently Asked Questions
- Sources
Why Sewer Hose Support Matters (And Why Stakes Aren’t Always an Option)
A sewer hose that sags in the middle doesn’t drain. It pools. Waste sits in that low spot, breeds odor, and eventually backs up toward your RV instead of flowing to the dump station. Forum members on iRV2 have documented this exact failure repeatedly. Surface supports that look stable on flat ground often shift once weight and gravity pull at an angle, which is why so many campers end up hunting for alternatives that resist creeping rather than sliding out of place mid-dump.
Stakes solve the slope problem in soft dirt. They fail everywhere else. Gravel pads won’t hold a stake without a mallet and a lot of patience. Concrete and asphalt pads don’t accept stakes at all. Plenty of campgrounds and HOA-managed RV communities explicitly ban ground penetration to protect buried utility lines or irrigation systems. And even where stakes are technically allowed, a sharply sloped site can make a staked support useless if the hose still bows in the middle of the run.
Consistent downhill grade isn’t just a flow issue. It’s a sanitation issue. A hose sitting flat or dipping mid-run holds waste against the interior wall longer than it should, which is where smell and bacterial buildup start. Keeping a steady pitch from your RV’s outlet to the dump inlet matters as much for hygiene as it does for drainage speed.
Pro Tip: If you’re using a vehicle or a fixed structure as your anchor point instead of a stake, secure the hose coupler with a hose clamp or zip tie in addition to the gravity fitting. Anchored setups shift less than staked ones, but a loose coupler under tension can still separate and cause backflow toward your rig.
What Are the Best No-Stake Support Options?
Four approaches cover almost every campsite situation you’ll run into. Each one solves the slope problem differently, and each has a sweet spot where it outperforms the others.
Tension-line suspension runs a line, usually rope or a rated strap, between two anchor points above ground level, then hangs the hose from that line at intervals. Because the hose rides above the terrain instead of resting on it, uneven ground stops being a variable. The line itself carries the load, not the dirt underneath it. This is the approach behind commercial kits like RV Levitator’s system, and it’s also buildable with a length of paracord and some carabiners if you want to go the DIY route first.
Clamp or vehicle-mounted anchors use your tow vehicle, a fence post, or a picnic table as one end of the support instead of a stake driven into soil. This works well for shorter runs where a fixed structure sits close enough to your RV’s outlet to hold the line at a workable angle. It’s less useful if your dump station connection is 20 feet away with nothing solid in between.

Weighted cradles skip anchoring entirely. Instead, a sandbag, filled water jug, or dense weight holds a support cradle in place through mass alone. These work on concrete pads and gravel lots where nothing can be driven into the ground, though they take more setup time than a line-based system because you’re stacking and adjusting weight rather than tensioning a single point.

Molded surface supports, the accordion-style plastic cradles you’ll see at most camping stores, sit directly on the ground and curve to follow terrain without any anchoring at all. They’re fast to unfold and put away, but on genuinely uneven ground they can still let the hose dip between cradle sections unless you add extras to fill the gaps.
| Method | Terrain suitability | Setup time | Stability | Storage size |
|---|---|---|---|---|
| Tension-line suspension | Gravel, slopes, hard surfaces | 5-10 minutes | High once tensioned | Compact, coils small |
| Vehicle/clamp anchor | Short runs near a fixed point | 3-5 minutes | Moderate, depends on anchor | Very compact |
| Weighted cradle | Concrete, gravel, no-dig zones | 8-12 minutes | High, but weight-dependent | Bulkier, weights add bulk |
| Molded surface support | Flat to moderately uneven ground | 2-3 minutes | Moderate, can sag on long runs | Folds flat, easy to store |

Pro Tip: Combine methods when your site demands it. A tension line across the open middle of a run with one molded cradle where the hose crosses a curb or drainage grate gives you the stability of suspension and the protection of a surface cradle where it actually matters.
How Do You Build a No-Stake Sewer Hose Support?
Two builds cover most situations: a PVC cradle for surface support and a rope tension-line for suspended support. Both use hardware store parts and neither requires special tools.
Build 1: PVC cradle support
- Cut a length of 4-inch PVC pipe in half lengthwise using a circular saw or a fine-tooth handsaw, creating a trough shape roughly 12 to 18 inches long.
- Drill two holes near each end of the trough, about half an inch from the rim, sized for a bolt or zip tie.
- Smooth any cut edges with sandpaper so nothing snags the hose surface, a step Touring Camper’s build guide documents with photos of the finished cradle.
- Set the cradle where the hose needs lift, then secure it in place with a weight underneath or a strap tied off to a nearby fixed point if the ground won’t hold a stake.
- Repeat every four to six feet along the hose run for longer distances, checking that each cradle sits slightly lower than the one before it to preserve the downhill grade.
Build 2: Rope tension-line
- Identify two anchor points, your tow vehicle’s hitch, a bumper, a fence post, or a heavy picnic table, positioned so the line runs at a steady downward angle toward the dump station.
- Run a length of paracord or nylon rope between the two points and tighten it with a turnbuckle or a ratchet strap rather than a hand-tied knot, which slips under load far more than rated hardware.
- Attach rated carabiners or quick-links at intervals along the line, spaced every three to four feet.
- Rest the hose in fabric slings or hose hangers clipped to each carabiner, letting the line carry the weight instead of the ground.
- Test the completed line with a gallon of water poured through the connection before your actual dump, watching for any low spot where the hose dips below the line’s overall slope.
Both builds pack down small. The PVC cradle nests inside itself or stacks flat in a storage bin; the tension-line kit coils into a bag not much bigger than a bundled extension cord. Keep all fasteners, bolts, and rope ends clear of the hose’s actual walking path so nothing punctures the material during transport or setup.
Pro Tip: Wrap electrical tape or a rubber sleeve around any exposed bolt heads on a PVC cradle. It’s a two-minute step that prevents the single most common cause of small hose punctures on DIY builds.
How Does the Levitator No-Stake System Work?
RV Levitator’s system replaces ground stakes entirely with a tension-line suspension design that lifts the hose above the terrain and holds it there with UV-resistant vinyl sleeves. Instead of hunting for solid ground to anchor into, you’re tensioning a line between two fixed points, the same principle behind a DIY paracord build, but with hardware designed specifically for the job rather than repurposed camping gear.
Installation follows a short sequence:
- Set your anchor points at your RV’s frame or hitch on one end and a fixed point near the dump station on the other.
- Run and tighten the tension line, adjusting until the line itself holds a steady downhill angle without any dip in the middle.
- Place the hose into the sleeve system, which cradles it along the line’s full length and shields it from sun and abrasion.
- Test with a water flush before committing to a full tank dump, confirming the slope holds under actual flow.
The company backs the system with a money-back guarantee and lists universal hose compatibility across its product pages, which matters if you’ve already got a hose you like and don’t want to replace it just to use a new support. The UV-resistant sleeve material also protects against a slower, less obvious problem: sun exposure that degrades hose material over a season of repeated use, even when the hose itself never touches bare ground.
This setup tends to earn its keep fastest on gravel pads, steep back-in sites, and paved slabs, exactly the surfaces where a stake either won’t hold or isn’t allowed. If your camping mostly happens on flat grass with soft soil, a basic stake might do the job fine. The moment your site turns to gravel or concrete, a suspension-based system stops being a convenience and starts being the only setup that actually works.
Pro Tip: Recheck line tension after your first hour of camp setup, not just at initial install. Vehicles settle, ground shifts slightly under leveling blocks, and a line that was perfectly taut when you arrived can loosen just enough to matter by the time you’re ready to dump.
How Do You Keep a No-Stake Hose Flowing Without Odor?
Before you pull the dump valve, run through a short check: confirm the slope still holds end to end, tighten any coupler that’s loosened since setup, and give the hose interior a quick rinse if it’s been sitting since your last stop. This takes under five minutes and catches most of the problems that turn into a mid-dump mess.
During the dump itself, short test flushes beat one long continuous release. A brief flush lets you watch the hose for any bulge or slow spot before you commit your full black tank, a habit echoed repeatedly across iRV2 member discussions on hose setups. If you’re using a suspended line, watch for any section where the hose swings or sags under the weight of moving water. That’s your signal to add an intermediate support before continuing.
Between uses, drain the hose fully and rinse the interior with a dedicated flush attachment rather than just hoping gravity got everything out. Odor problems almost always trace back to residue left behind after a dump, not the support method itself. Storage matters just as much: a hose coiled wet into a bin will smell far worse next trip than one dried before it’s packed away. Covering it also protects against UV breakdown during transport and storage between trips.
Pro Tip: Keep a small bottle of enzyme-based hose cleaner in your rig. A quick rinse with it after each dump does more for long-term odor control than any support method, no matter how well the support holds your slope.
What Are the Most Common No-Stake Setup Mistakes?
Sagging mid-run is the complaint that shows up most often across forum threads and DIY blogs, and it almost always traces to one of a few fixable causes.
- The line was tensioned once and never rechecked. Retension before every dump, not just at initial setup. Ground shifts and lines stretch slightly under repeated use.
- One long span with no intermediate support. Add a cradle or additional anchor point every four to six feet on longer runs instead of relying on two end points to hold the whole line taut.
- The vehicle anchor point moved. If you’re using a tow vehicle as one anchor, confirm it hasn’t rolled or settled since you leveled the RV.
- A coupler loosened under vibration. Recheck every fitting along the run, not just the ends, since a loose middle joint can drop the whole section’s slope.
Distinguishing slow flow from an actual clog matters before you start troubleshooting. Slow flow usually means insufficient slope somewhere along the run; a true clog means water backs up at a specific point and won’t move even with added pressure. If you suspect a clog, close the valve, disconnect safely at the RV end first, and never work directly at the dump station inlet without gloves and eye protection given the contamination risk. Cross-contamination at that connection point is the single biggest safety concern in the entire process, more than any support method issue.
Which No-Stake Support Should You Choose?
Match your choice to your site conditions rather than picking based on price alone. Work through this checklist in order:
- Check your surface first. Gravel or concrete rules out stakes entirely; soft grass gives you more flexibility but doesn’t rule out a suspension system as the better long-term choice.
- Measure your hose run. Under 10 feet works fine with a simple vehicle anchor or a single cradle; longer runs need either a tensioned line or multiple intermediate supports.
- Identify available anchor points. A hitch, a fence, or a heavy picnic table nearby makes a tension-line setup fast; without one, a weighted cradle becomes your best bet.
- Consider your setup time. If you’re pulling in for one night, a molded surface cradle deploys in under three minutes; if you’re settling in for a week or more, a tensioned system is worth the extra five minutes to install correctly.
- Factor in storage space. Weighted cradles take up the most room in a bay; tension-line kits and PVC cradles pack down smallest.
- Set your budget. A DIY PVC build costs under $20 in parts; a commercial kit costs more upfront but saves the trial-and-error most DIY builders go through on their first two or three attempts.
For a paved pad, a weighted cradle or a suspension kit wins every time since stakes simply aren’t an option. For gravel, the same logic applies. For a steep back-in site, tension-line suspension holds grade better than anything resting on the ground. For a long run between your RV and the dump station, intermediate supports aren’t optional, they’re the difference between a hose that drains and one that pools halfway through.
A Practical Take on What Actually Holds Up at Camp
The gap between a support method that sounds solid and one that actually survives a full black tank dump usually comes down to one detail: what happens to your anchor points after the first hour of camp. A line that’s perfectly taut at 2 PM can be noticeably looser by dinner once a vehicle settles or a leveling block shifts under weight. Most guides skip this because it’s not a dramatic failure, it’s a slow one, and it only shows up if you check.
The honest trade-off between DIY builds and a ready-made kit isn’t stability, it’s consistency. A well-built PVC cradle or tension line holds up fine on a given weekend. What varies is whether it holds up the same way on your next trip, at a different site, with different anchor points available. A commercial system built around a repeatable install process removes that variable, which is exactly why campers who move between wildly different site types tend to gravitate toward one eventually, even after starting with a homemade rig.
None of this means DIY builds are a waste of time. A PVC cradle you cut yourself for under $20 will outperform a poorly maintained commercial kit every time. The real lesson is that support method matters less than whether you’re actually rechecking it before every dump, and that discipline costs nothing regardless of which system you choose.
Ready to Skip the Trial and Error?
If you’ve built a PVC cradle or rigged a rope tension-line and found yourself re-tensioning it every other trip, you already know the real cost of a DIY setup isn’t the materials, it’s the fiddling. RV Levitator’s tension-line suspension system is built to hold its grade across gravel, slopes, and paved pads without a single ground stake, and it comes with UV-resistant sleeves that a homemade rig usually can’t match.

The setup includes universal hose compatibility, so you’re not replacing gear you already trust, just giving it a better way to sit above uneven ground. Every product on the Levitator support page ships with a money-back guarantee, which means trying it costs you nothing if it doesn’t hold up at your first campsite. If your rig regularly lands on gravel pads or steep sites, check the uneven-ground support option built specifically for that terrain, and get your next trip set up before you need it.
Frequently Asked Questions
What is the best sewer hose support option that doesn’t use stakes?
Tension-line suspension tends to perform best across the widest range of surfaces, since it holds slope through the line itself rather than depending on ground conditions. A weighted cradle is the better call on paved pads where you want the simplest possible setup.
Can I build a working sewer hose support without buying a kit?
Yes. A PVC cradle cut to length or a rope tension-line rigged between your hitch and a fixed point both work well, though they take more retensioning over time than hardware built specifically for the job.
How do I stop my hose from sagging in the middle on a no-stake setup?
Add an intermediate cradle or anchor point every four to six feet on longer runs, and retension your line before every dump rather than assuming your initial setup still holds.
Does a no-stake support work on steep or sloped campsites?
Suspension-based systems generally handle steep sites better than surface cradles, since the line can be angled independently of whatever the ground is doing underneath it.
Is the Levitator system compatible with any RV sewer hose?
Yes. RV Levitator lists universal hose compatibility across its product line, so you can use your existing hose with the tension-line system rather than replacing it.
Leave a Reply