
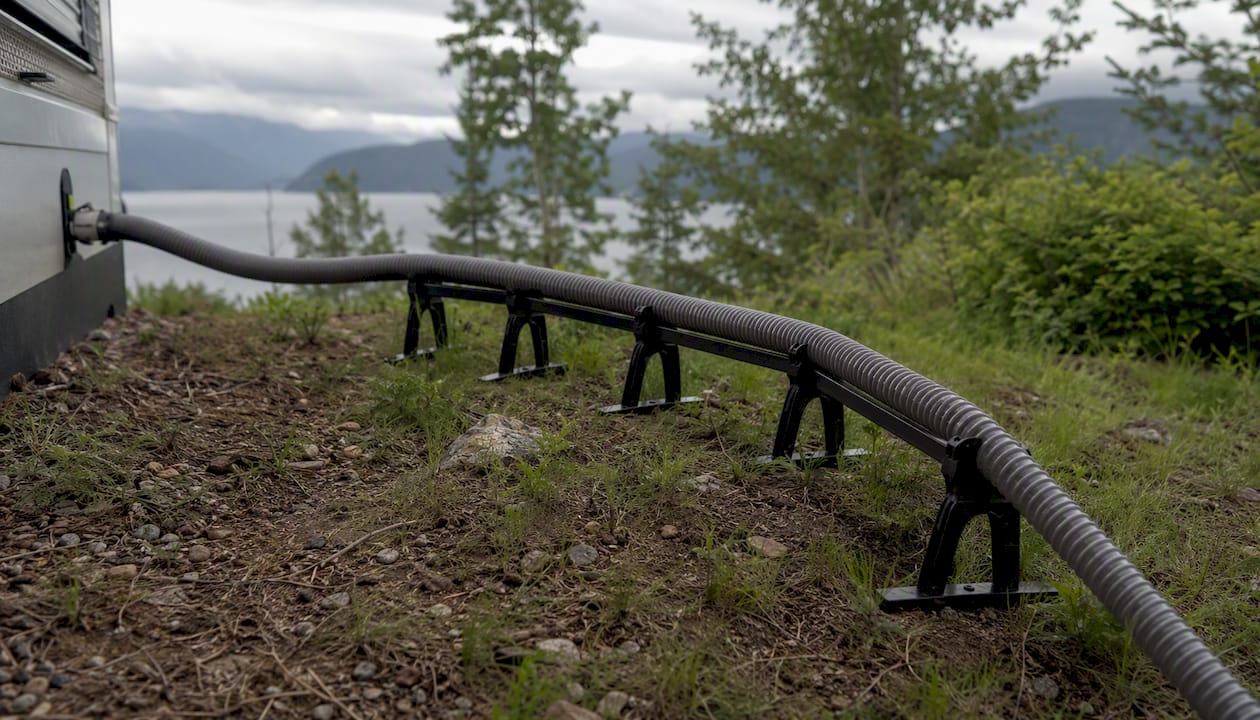
Carry a 20-foot sewer hose as your primary and a 5–10-foot extension as backup. That combination covers the vast majority of U.S. campsite hookups while staying manageable to store and rinse. Experienced RVers on iRV2 confirm 20 feet handles most sites, with the extra length acting as low-cost insurance for the occasional awkward hookup.
Here’s what to have in your kit:
- Primary hose: A two-piece 20-foot kit (two 10-foot sections with bayonet fittings and a clear elbow)
- Backup extension: One 5–10-foot spare section for longer runs or unusual dump inlet placement
- Adapters: A 4-in-1 adapter for variable inlet sizes and spare O-rings
Key Takeaways
A 20-foot primary hose paired with a 5–10-foot backup extension covers the vast majority of U.S. campsite hookups, and a proper hose support makes that length perform better than a longer unsupported run.
| Point | Details |
|---|---|
| Recommended length | Carry a 20-foot two-piece kit as your primary hose and a 5–10-foot spare for unusual sites. |
| Measure before you buy | Walk the actual route from tank outlet to dump inlet and add 2–3 feet of margin. |
| Support the hose | A tension-line support prevents sag and pooling, making a 20-foot hose drain cleaner than an unsupported longer run. |
| Inspect every fitting | Check O-rings and seat bayonet fittings fully before opening the tank valve to prevent leaks at joints. |
| Rvlevitator supports | The Rvlevitator tension-line system works on any terrain and includes UV-resistant sleeves to protect your hose. |
Table of Contents
- What RV sewer hose length fits each campsite situation?
- How hose length affects drainage (and why longer isn’t always better)
- How to measure the hose length you actually need
- How to safely connect multiple hoses
- What diameter and fittings should you expect?
- When does a run longer than 25 feet make sense?
- How to maintain and store your sewer hose
- Why hose supports change what length actually works
- The case for keeping it simple (and why most RVers overthink this)
- Hose supports that make your 20-foot run work every time
- Sources
What RV sewer hose length fits each campsite situation?
The four lengths you’ll see most often are 10, 15, 20, and 25 feet. Each fits a different scenario, and choosing wrong means either scrambling for an extension or dragging excess hose across a gravel pad.
| Length | Best For | Trade-off |
|---|---|---|
| 10 ft | Pull-through sites, rear-outlet rigs parked close to the inlet | No flexibility if the inlet is farther than expected |
| 15 ft | Smaller rigs with mid-RV tank outlets on standard sites | Borderline for longer rigs or offset inlets |
| 20 ft | General use — covers the vast majority of hookup sites | Slightly more to store; two 10-ft sections solve this |
| 25 ft | Long rigs, rear-bumper outlets, or sites with offset inlets | Sag risk increases; supports become more important |

Expert guidance recommends a 20–25-foot hose as sufficient for nearly all campsite hookups, with the advice to pick the shortest hose that reaches with a small margin. A two-piece 20-foot kit wins for most RVers because you can use just one 10-foot section when the inlet is close, then connect both when you need the full reach. That flexibility beats carrying a single 25-foot hose you rarely use in full.
Pro Tip: Buy a two-piece 20-foot kit rather than a single 20-foot hose. Two 10-foot sections store more compactly in a bumper tube and give you a built-in short-run option.
How hose length affects drainage (and why longer isn’t always better)
RV sewer systems rely entirely on gravity. Waste flows downhill, and that’s it. There’s no pump pushing things along, so the slope of your hose from the tank outlet to the dump inlet is what makes the system work.

A longer hose creates more opportunities for sag. Every low point in the hose becomes a trap where waste and rinse water pool instead of flowing through. That pooling slows drainage, leaves residue behind, and eventually causes partial clogs that are unpleasant to clear in the field.
A few site factors change how much length you actually need:
- Tank outlet position: A mid-chassis outlet adds distance before the hose even reaches the ground
- Campsite layout: Trees, curbs, or utility boxes may force a longer route around obstacles
- Dump inlet placement: Some inlets sit at the far edge of the pad, adding 5–8 feet you didn’t expect
- Ground slope: A sloped pad can work in your favor (downhill toward the inlet) or against you
Pro Tip: Attach a clear 90-degree elbow at the dump inlet end. You can watch the flow and confirm the hose is rinsing clean before you disconnect — no guessing.
Shorter, straighter runs are easier to rinse and less likely to trap residue. Longer hoses increase sag and pooling risk, so the right approach is “just long enough plus a small margin” rather than hauling the longest hose you can find. For more on keeping your drainage clean, see RV waste drainage best practices.
How to measure the hose length you actually need
Guessing at the campsite wastes time. A quick measurement before you buy, or right when you arrive, saves you from being 3 feet short at an inconvenient moment.
- Locate your tank outlet. Find the sewer outlet on your RV, usually near the rear or mid-chassis on the driver’s side.
- Measure to the rear bumper or hose exit point. This is the distance the hose travels before it reaches the ground.
- Walk the route to the dump inlet. Don’t measure in a straight line — follow the actual path the hose will take, routing around obstacles.
- Measure to the dump inlet opening, not just to the edge of the concrete pad. The inlet may be set back or recessed.
- Add 2–3 feet of margin. This covers elevation changes, connector length, and small offsets you didn’t account for.
- Round up to the nearest standard length. If your measurement is 17 feet, buy a 20-foot kit.
Measuring the actual run and adding a small margin avoids being short without overloading you with excess hose. Two-piece kits let you use shorter runs most of the time while giving you full reach when needed.
If you can’t measure in advance, check campground maps or photos online, or call the host and ask where the dump inlet sits relative to the hookup pad. Most campground hosts know this off the top of their heads.
Pro Tip: Measure to the dump inlet, not the pad edge. Inlets are often recessed 6–12 inches from the pad surface, and that gap adds up when you’re already at the limit of your hose.
How to safely connect multiple hoses
Yes, you can join two or more RV sewer hose sections together. The key is using the right connectors and checking every seal before you open the tank valve.
- Use dedicated bayonet/lug-style sewer hose adapters — these are designed for the task and seat firmly without improvised couplers
- Attach a clear 90-degree elbow at the dump inlet end so you can monitor flow and spot any backup before it becomes a problem
- Inspect every O-ring before connecting; a flat, cracked, or missing O-ring is the most common source of leaks at joints
- Twist each fitting until it locks — a half-seated bayonet fitting looks connected but will leak under flow
- Use end caps on any unused fittings while you’re working to avoid accidental spills
Clear elbows and dedicated bayonet adapters let you join hoses safely and monitor flow; supports prevent pooling by maintaining a downhill slope. The more joints in your run, the more potential leak points you have, so keep multi-section runs to two sections when possible and inspect every connection after your first dump.
Avoid mixing cam-lock fittings with standard bayonet/lug fittings without a dedicated adapter. Forcing incompatible fittings together risks a loose connection that fails mid-dump. If your RV uses a specialty system like a Waste Master, check whether it needs its own adapter before connecting a standard extension hose.
What diameter and fittings should you expect?
Most RV sewer hoses use a 3-inch diameter with standard bayonet (also called lug) fittings at the RV outlet end. That’s the near-universal standard across Class A, B, and C motorhomes and fifth wheels built for the U.S. market.
The dump inlet side is less consistent. Dump inlet threads vary across parks — you’ll encounter 3-inch, 3.5-inch, and 4-inch openings, which is exactly why most quality kits include a 4-in-1 adapter that handles all three sizes plus a slip fit.
Carry this short list of fitting parts and you’ll handle almost any site:
- 4-in-1 adapter for variable dump inlet sizes
- Spare O-rings in the sizes your fittings use (they dry out and crack over time)
- Clear 90-degree elbow for flow monitoring at the inlet
- End caps for both ends of the hose during storage and transport
- Dedicated extension adapter if your campsite has an unusual or recessed inlet
Specialty systems like cam-lock or Waste Master setups use different fittings and typically need a glue-on or screw-on adapter to connect a standard extension hose. Check your system’s specs before buying a generic extension.
When does a run longer than 25 feet make sense?
For most RVers, 25–30 feet is the practical ceiling for a continuous gravity-fed sewer hose run. Beyond that, maintaining a consistent downhill slope across the full length gets difficult, and sag becomes almost unavoidable without multiple support points.
Situations where you might need more than 25 feet are genuinely rare: a remote dump station set far from hookup pads, an unusual campsite layout where the inlet is on the opposite side of the pad, or a very long rig with a mid-chassis outlet parked at an angle.
When you do face a long run, here are your options:
- Short-term disposable extension: A cheap 5–10-foot throwaway section for a single unusual site — forum veterans recommend this over always hauling a heavy continuous long hose
- Macerator pump: Grinds waste and pumps it through a smaller-diameter hose over longer distances; useful for full-timers or boondockers near remote dumps, but adds cost and maintenance
- Reposition the RV: If the site allows it, pulling forward or backing up a few feet often solves the problem without any extra hose
A macerator is a reasonable investment if you regularly camp at sites with distant dumps. For occasional long runs, a cheap extension stored in a zip-lock bag costs almost nothing and takes up almost no space.
How to maintain and store your sewer hose
A well-maintained hose lasts years. A neglected one cracks, leaks, and starts holding odors you can’t rinse out.
- Rinse after every dump. Run fresh water through the hose until it runs clear — use the clear elbow to confirm. Don’t skip this step even on short trips.
- Avoid dragging the hose across gravel or asphalt. Abrasion wears through the outer layer and eventually causes pinhole leaks. Lift and carry it, or use a protective sleeve.
- Cap both ends before storing. Open ends collect dirt, insects, and moisture that degrade the interior.
- Store compressed in a dedicated tube or bumper storage. Avoid sharp bends that stress the accordion folds and cause cracking at the flex points.
- Keep it out of prolonged UV exposure. Sun degrades most hose materials over time; a UV-resistant cover or sleeve extends lifespan significantly.
Thicker-walled hoses in the 23–25 mil range resist crushing and abrasion better than 15-mil vinyl options, which suits occasional users but wears faster under regular use. If you dump frequently, the heavier material pays for itself.
Replace your hose when you see cracks in the accordion folds, persistent odor that doesn’t rinse out, or fittings that no longer seat firmly. Field repairs with hose tape buy you a trip home, not a season.
Pro Tip: For detailed rinsing and inspection routines, the RV hose maintenance guide covers step-by-step care for every trip. And for between-trip storage, RV hose storage tips walk through capping, coiling, and container options.
Why hose supports change what length actually works
A hose lying on uneven ground sags. A hose suspended on a support system maintains a consistent downhill slope from the tank outlet to the dump inlet. That difference determines whether your 20-foot hose drains cleanly or traps waste at every low point.
Supports keep a steady drop and prevent sags that trap waste, making longer runs work more reliably and improving rinse effectiveness. With a good support, a 20-foot hose performs better than an unsupported 25-foot hose on the same site.
What to look for in a support system:
- Tension-line design: Suspends the hose above the ground rather than just propping it at intervals, so it works on gravel, grass, and uneven terrain
- UV-resistant vinyl sleeves: Protect the hose from sun damage and abrasion while keeping the setup clean
- Modular sections: Let you configure the support to match your actual hose length and site layout
- Fast setup: A support you skip because it’s complicated defeats the purpose
Pro Tip: Route your support points so the hose has a single continuous fall from the RV outlet to the dump inlet. Even one uphill section in the middle creates a trap. Tension-line systems like the Rvlevitator make this easier because the line pulls the hose taut along the full run.
The right support doesn’t just prevent clogs — it lets you use a shorter, lighter hose and still get clean drainage. Instead of adding an extra 5 feet of hose to compensate for a sag, add a support and keep your run tight. You’ll rinse faster, store less, and have fewer leak points.
Pro Tip: Check out camping sewer hose support options to compare support styles and find the right fit for your rig and typical sites.
The case for keeping it simple (and why most RVers overthink this)
The RV community spends a lot of energy debating hose brands, lengths, and materials. After seeing countless forum threads and campsite setups, the honest answer is that most of the problems RVers blame on hose length are actually support problems. A 20-foot hose with a proper tension-line support outperforms a 30-foot hose lying on the ground every single time.
The 20-foot-plus-extension approach works because it matches how campgrounds are actually built. The vast majority of U.S. hookup sites place the dump inlet within 15–20 feet of where your tank outlet ends up. The rare exception, the site where you genuinely need 25+ feet, is exactly that: rare. Carrying a cheap 5–10-foot throwaway extension handles it without making every other trip heavier and more complicated.
What most guides understate is how much a support changes the math. When your hose is properly elevated and tensioned, you need less total length to get a clean drain. That’s not a minor detail — it’s the reason experienced full-timers often carry a shorter primary hose paired with a solid support rather than a longer hose with nothing holding it up.
Hose supports that make your 20-foot run work every time
Sag is the real enemy of clean RV drainage, and the fix isn’t more hose. The Rvlevitator tension-line hose support system suspends your hose above any terrain — gravel, grass, or sloped pads — so you get a consistent downhill slope from tank outlet to dump inlet, every hookup.

Here’s what sets a quality support apart:
- Tension-line suspension that works on uneven ground, not just flat concrete
- UV-resistant vinyl sleeves that protect your hose from sun and abrasion, extending its lifespan
- Modular sections that configure to your hose length and site layout in minutes
- Universal hose compatibility so it works with any standard 3-inch sewer hose
Rvlevitator backs every support with a money-back guarantee. If it doesn’t solve your drainage problem, you get your money back. Browse the full hose support kit collection and find the right setup for your rig.
Sources
- Best RV Sewer Hose – Escapees
- How Long Should an RV Sewer Hose Be? – The Fun Outdoors
- Recommended Sewer Hose Length? | iRV2 Forums an RV LIFE Community
- Best RV Sewer Hose: 7 Durable Kits Compared (2026) – RV Flush Guide
- How to Find the Best RV Sewer Hose – RV Pioneers
Leave a Reply