
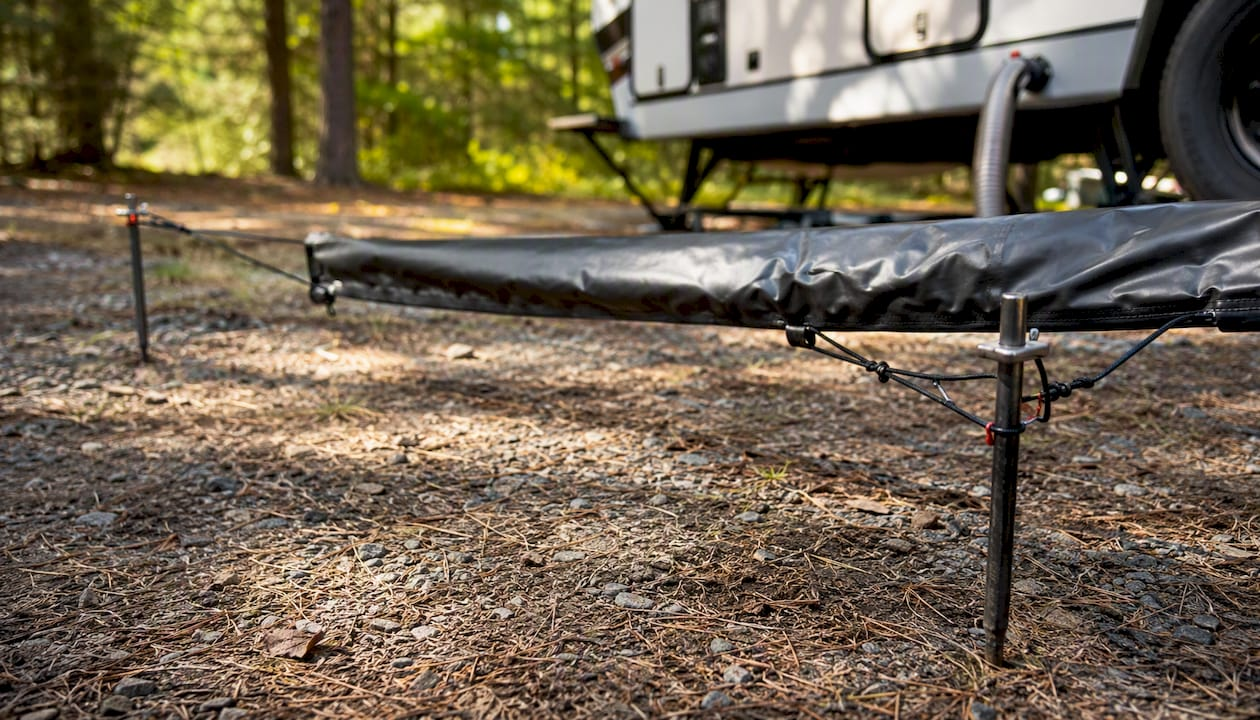
For a multi-day or multi-week RV stay, the right choice is a suspended, modular, UV-resistant sewer hose support with anchoring options to prevent shifting — and the Rvlevitator system is built exactly for that job. If you need a fast decision, here are the attributes that matter most:
- Terrain compatibility: works on gravel, grass, slopes, and soft ground without tipping
- Height adjustability: keeps a consistent downward slope from your RV to the sewer pedestal
- UV-resistant materials: vinyl sleeves or UV-stable components that won’t crack after days in direct sun
- Modular design: sections that connect end-to-end for runs longer than a basic kit
- Universal hose fit: accommodates standard 3-inch RV sewer hoses without adapters
- Theft and shift prevention: stakes, tie-offs, or anchor points so the system stays put
You can order the Rvlevitator system directly from the Levitator product page and have it shipped to your door before your next trip.
Pro Tip: Order one extra modular section than you think you need. Campsite pedestal distances are almost always farther than they look when you’re planning at home.
Key Takeaways
A suspended, UV-resistant, modular hose support is the most reliable choice for extended RV stays because it maintains drain angle, protects the hose from sun and grime, and holds position on any terrain.
| Point | Details |
|---|---|
| Choose suspension over cradles | Suspension-line systems hold drain angle on uneven ground without tipping or sinking over time. |
| UV resistance is non-negotiable | Vinyl sleeves and UV-stable components prevent cracking and brittleness during multi-week sun exposure. |
| Modular sections extend your reach | Connect additional sections to match any pedestal distance without buying a second kit. |
| Weekly maintenance keeps odors away | Flush the hose, inspect straps and stakes, and wipe supports with a diluted sanitizer every 7 days. |
| Rvlevitator for long stays | The Levitator suspension system covers terrain compatibility, UV protection, and modular expandability in one kit with a money-back guarantee. |
Table of Contents
- Why long stays put your sewer hose support under real stress
- How to choose the right hose support for an extended stay
- How to set up your hose support at any campsite
- Keeping your system clean and functional during a long stay
- When a temporary fix is acceptable and when it isn’t
- Why the Levitator suspension system fits long stays better than alternatives
- What using a proper support actually looks like over a long stay
- Ready to set up the Levitator for your next long stay?
- Sources
Why long stays put your sewer hose support under real stress
A one-night hookup is forgiving. You connect, dump, disconnect, and move on. A week-long or month-long stay is a different situation entirely, and your hose support system feels every day of it.
Experienced RVers on iRV2 forums consistently point out that ground routing works tolerably for short stops but creates real problems over extended periods. Here’s what actually happens when you leave a hose unsupported for days:
- UV degradation: Direct sun breaks down plastic components and unprotected hose material faster than most people expect. A support that looks fine after one weekend can be brittle and cracked after two weeks of summer sun.
- Slow sagging: Even a support that holds its shape on day one will gradually lose height under the weight of a full hose. A sag of just a few inches creates a low spot where waste pools instead of draining, leading to odors and eventual backups.
- Ground movement: Gravel shifts, grass compresses, and soft soil settles. A support sitting on the ground can tilt or sink over several days, throwing off your drain angle.
- Animal and foot traffic: Campsite neighbors, dogs, birds, and rodents all interact with gear left on the ground. Hoses that sit unprotected get pecked at, chewed on, or kicked out of position.
- Grime and biofilm buildup: Hoses resting on or near the ground collect dirt, moisture, and organic debris. Over a long stay, that buildup becomes a hygiene issue.
The RV Forum community backs this up, with users noting that supports are most valuable for longer stays and that disposable gloves and regular checks are part of the routine. The principle isn’t unique to RVs either. Industrial hose suspension systems used in commercial settings are designed specifically to keep hoses off the ground because contact with surfaces accelerates contamination and wear.
Pro Tip: Pair your support with a UV-resistant vinyl sleeve over the hose itself. The sleeve blocks sun and keeps dirt from sticking to the hose surface, which makes end-of-stay cleanup much faster.
How to choose the right hose support for an extended stay
Not every support on the market is built for the demands of a long stay. Coach-Net’s practical guide to sewer hose supports highlights that maintaining a consistent drain angle is the core job of any support, and that’s harder to do over time without the right design. Here’s what to evaluate before you buy:
Material and UV resistance
Look for UV-stabilized plastic, powder-coated metal, or vinyl-sleeved components. Standard accordion-style plastic cradles collect dirt in their folds and tend to become brittle after prolonged sun exposure. A support with a protective sleeve or UV-rated housing holds up far better over a two-week stay than bare plastic.

Stability and load capacity
A full 10-foot sewer hose holds more weight than it looks. The support needs wide, stable feet or an anchoring mechanism, not just a narrow base that tips on uneven ground. Suspension-style systems that use a tension line between anchor points distribute the hose’s weight more evenly than individual cradles sitting on the ground.

Modularity and expandability
Campsite pedestal distances vary. A system that connects in sections lets you extend the run without buying a completely new kit. This is a well-established principle in industrial hose management: modular hose support extensions are standard in heavy-duty installations precisely because fixed-length systems can’t adapt to every layout.
Universal hose compatibility
Standard RV sewer hoses are 3 inches in diameter. Confirm the support accommodates that size without requiring adapters. Most quality supports list this explicitly.
Ease of setup and storage
For a long stay, you want a system you can set up once and leave in place confidently. Aim for a support you can install solo in under 20 minutes. When you pack out, it should fold or collapse to fit in a standard storage bay.
Price and value
Entry-level accordion cradle sets are generally affordable. Mid-range adjustable-height cradle systems offer a balance of features and cost. Suspension-style systems with sleeves and modular sections tend to be more expensive but offer greater durability and flexibility. For a long stay, the extra investment in a suspension system pays off in fewer adjustments, less cleaning, and a hose that lasts longer.
How to set up your hose support at any campsite
Good setup takes about 15 minutes when you know the sequence. Two people can do it in under 10. Here’s how to approach it regardless of terrain:
- Assess the run. Walk from your RV’s sewer outlet to the campsite pedestal. Note the distance, any slope direction, obstacles (rocks, roots, curbs), and ground type.
- Lay out your sections. Connect your modular support sections end-to-end along the planned route before anchoring anything. This lets you spot gaps or tight turns before you commit.
- Set anchor points. For suspension systems, identify what you’ll tie off to: a stake in the ground, a hitch receiver, a tree, or a campsite post. Soft ground needs longer stakes; gravel needs wider-base stakes or a rock anchor.
- Adjust height for slope. The hose should drop consistently from your RV outlet toward the pedestal. Raise the RV-end anchor point higher than the pedestal end. Even a gentle, consistent slope is enough for gravity to do its job.
- Run the tension line. For suspension-style supports, thread the line through or over each section and pull it taut before securing both ends. The hose should rest in the support without touching the ground at any point.
- Connect the hose and check the angle. Once the support is in place, connect your sewer hose and visually confirm there are no low spots or sags along the run.
- Secure against shifting. Stake down any ground-contact points. For longer stays, add a secondary tie-off at the midpoint of the run to prevent wind or foot traffic from displacing the system.
Terrain-specific notes:
- Gravel: Use wide-base stakes or flat-foot anchors that won’t sink. Avoid narrow spike stakes, which pull out easily in loose gravel.
- Soft ground or grass: Drive stakes at an angle (roughly 45 degrees) for better hold. Check them after the first rain.
- Sloped sites: Prioritize height at the RV end. You may need to stack a flat stone or use an adjustable-height post at the uphill anchor to get enough elevation.
- Trees or rocks nearby: Use them as natural anchor points with a bungee or ratchet strap. This saves stakes and gives you a more stable anchor than soft soil.
Pro Tip: After setup, run a small amount of water through the hose and watch it flow. If it pools anywhere, that’s your low spot. Adjust the support height at that point before you start using the system for waste.
Forum users on The RV Forum recommend checking strap tension and anchor points after the first 24 hours, since ground settling and hose weight can shift things slightly after the initial setup.
Keeping your system clean and functional during a long stay
A long stay means your hose and support are working every day. A simple maintenance routine keeps odors down, connections tight, and the system sanitary.
Daily checks (takes 2 minutes):
- Visually inspect the hose for sags or low spots
- Confirm both end connections are seated and sealed
- Check that no part of the hose is resting on the ground
Weekly maintenance steps:
- Put on disposable gloves and eye protection before touching any connections.
- Disconnect the hose at the pedestal end and flush it with clean water.
- Inspect the hose surface for cracks, abrasion, or discoloration from UV exposure.
- Check support straps, tension lines, and anchor stakes for looseness or wear.
- Wipe down the support sections with a diluted bleach solution (1 tablespoon per gallon of water) or an RV-safe sanitizer.
- Reconnect and re-check the drain angle.
For odor control, a regular dose of an enzyme-based tank treatment helps break down waste solids before they can build up and cause smell. RV waste drainage best practices recommend keeping the black tank valve closed between dumps rather than leaving it open, which prevents liquid from draining away and leaving solids to dry and harden.
If you leave the rig unattended for a day or more:
- Close all tank valves
- Disconnect the hose at the pedestal end and cap it
- Secure the support system with an additional stake or tie-off so wind can’t displace it
Always wear disposable gloves when handling sewer connections. iRV2 forum members consistently flag this as a basic must-have, and it’s the single easiest way to keep the maintenance routine hygienic.
When a temporary fix is acceptable and when it isn’t
Rocks, bricks, ramps, and improvised cradles can hold a hose off the ground in a pinch. For an overnight stop or a same-day dump, a temporary elevation is fine. The hose is only in place for a few hours, the stakes are low, and you’re right there to monitor it.
For a multi-day or multi-week stay, those same improvised solutions create real problems:
- Rocks and bricks are uneven and can pinch or abrade the hose over time. They also shift when the ground moves or someone walks nearby.
- Plastic ramps designed for short-term use don’t maintain a consistent height along the full run. They create multiple low spots rather than a smooth slope.
- Improvised cradles (buckets, coolers, folded chairs) are unstable and not designed to hold the weight of a full hose for days at a time.
The core issue is consistency. A temporary fix might hold the hose off the ground at one point, but it won’t maintain the drain angle along the entire run. Over several days, that inconsistency leads to pooling, odors, and eventually a backup.
Pro Tip: If you need an immediate fix while waiting for a proper support to arrive, use a folded yoga mat or a thick foam block under the hose at the midpoint. It’s softer than rocks, won’t abrade the hose, and gives you a stable, flat surface. Replace it with a purpose-built support as soon as possible.
Why the Levitator suspension system fits long stays better than alternatives
The Rvlevitator system is designed around the specific failure modes that show up during extended stays: sag, UV damage, terrain instability, and grime accumulation. Here’s how its features map to the buying criteria covered above:
- Suspension-line design: Instead of individual cradles sitting on the ground, the Levitator uses a tension line that suspends the hose above any terrain. This eliminates the tipping and sinking problems that affect ground-contact supports on gravel, grass, and soft soil.
- UV-resistant vinyl sleeves: The included sleeves wrap the hose and protect it from direct sun. They also keep dirt and debris from sticking to the hose surface, which makes end-of-stay cleaning faster.
- Modular covers and sections: The system connects in sections, so you can extend the run to match your campsite’s pedestal distance without buying a separate kit.
- Universal hose compatibility: The Levitator fits standard 3-inch RV sewer hoses, so you don’t need adapters or special connectors.
- Quick installation: The system is designed for a single-person setup, typically achievable in under 20 minutes on most campsites.
- Money-back guarantee: Rvlevitator backs the product with a satisfaction guarantee, which matters when you’re buying a support system you plan to rely on for weeks at a time.
The system has been tested on uneven terrain including gravel pads, sloped sites, and grass, which is exactly the range of conditions you’ll encounter at U.S. campgrounds. You can browse the full RV hose support product range to see kit options and accessories.
For camper-specific rigs with shorter hose runs, the camper-focused support kits offer a right-sized option without paying for more sections than you need.
What using a proper support actually looks like over a long stay
Setting up a suspension-style support for the first time can feel like more work than just laying the hose on the ground. The tension line, the anchor stakes, the sleeve threading — it’s a few extra steps compared to a basic cradle kit.
What you notice by day three is that you stop thinking about the hose entirely. No adjustments, no odor creeping in from a low spot, no morning check to see if something shifted overnight. The drain angle holds because the line holds, not because the ground happened to cooperate.
The cleanup at the end of a long stay is also noticeably easier. A hose that’s been suspended in a sleeve for two weeks has far less surface grime than one that’s been resting on gravel or grass. That’s not a small thing when you’re breaking camp and want to get moving.

If there’s one thing worth doing differently from the start, it’s driving the anchor stakes deeper than you think necessary. A stake that feels solid on day one can work loose after a week of temperature swings and ground movement. An extra inch of depth costs nothing and saves a mid-stay readjustment.
Ready to set up the Levitator for your next long stay?
The Rvlevitator system gives you a suspension-based RV sewer hose support that works on any terrain, ships to your door, and installs in under 20 minutes. It’s the practical alternative to improvised fixes and basic cradle kits that don’t hold up past the first few days.

Kits include the suspension line, UV-resistant vinyl sleeves, modular sections, and the hardware you need for a complete setup. For longer runs or full-season stays, the hose support kit bundles include extra sections and sleeve coverage so you’re not piecing together accessories after the fact. Rvlevitator backs every order with a money-back guarantee, so there’s no risk in trying it before your next trip. Head to the product page, pick your kit size, and have it ready before you pull out of the driveway.
Sources
- 10 Things RVers Should Know About RV Sewer Hose Supports
- Sewer Hose Support | iRV2 Forums an RV LIFE Community
- Sewer hose support | The RV Forum an RV LIFE Community
- Hose suspension for wall mounting. Maximum 20 metre hose.
Leave a Reply