
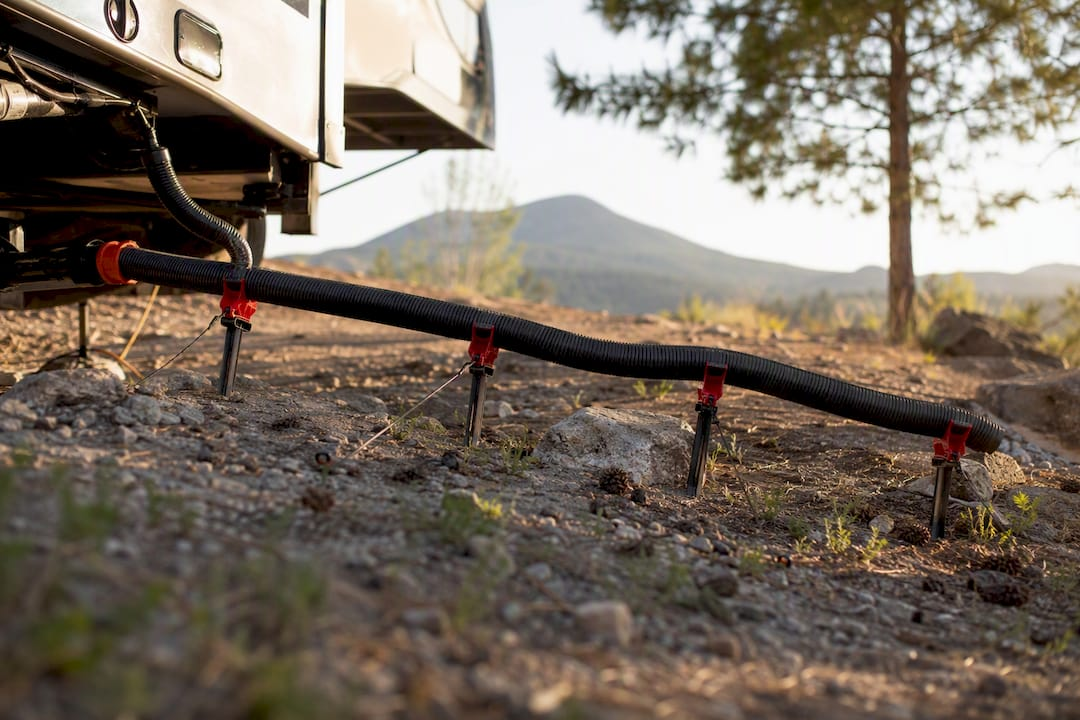
The fastest fix for RV sewer hose drainage problems on uneven ground is a continuous downhill slope from your outlet to the dump inlet, held in place with hose supports spaced every 5 to 6 feet. A 20-foot run needs at least three to four support points to keep that slope honest from one end to the other.
Before you touch the hose, run this checklist:
- Attach the bayonet fitting or clear elbow at the RV outlet first, not at the dump inlet.
- Set your first support high, right under the outlet, then step each following support down toward the inlet.
- Dump the black tank before the gray tank, always.
- When you’re done, disconnect the hose at the dump end first, never at the RV.
Pro Tip: Lock your first support in place with a wheel chock or a staked tension line. One gust of wind or one curious dog nosing the hose is all it takes to create a sag that undoes your whole setup.
Key Takeaways
Reliable downhill drainage on uneven ground comes down to three things: continuous slope, supports every 5 to 6 feet, and strict dump order.
| Point | Details |
|---|---|
| Maintain continuous slope | Keep roughly 1/8 to 1/4 inch of drop per foot from RV outlet to dump inlet. |
| Space supports correctly | Use a support every 5 to 6 feet, with 3 to 4 supports on a 20-foot run. |
| Follow dump order | Attach at the RV first, dump black tank then gray, remove hose at the dump end first. |
| Fix uphill inlets with step-downs | Use leveling blocks, gutters, or a macerator pump only when gravity truly fails. |
| Choose terrain-ready supports | Rvlevitator’s tension-line supports suspend the hose above gravel and slopes instead of resting on tippy stands. |
Table of Contents
- Why Rv Sewer Hose Downhill Slope Actually Matters
- How Do You Set Up A Downhill Sewer Hose Run?
- Which Hose Supports Actually Hold A Slope On Rough Ground?
- Why Won’t My Sewer Hose Drain Downhill?
- Keeping Your Setup Reliable Trip After Trip
- What We’ve Learned Building Supports For Uneven Sites
- Get A Setup That Holds Its Slope Every Time
- Frequently Asked Questions
- Sources
Why Rv Sewer Hose Downhill Slope Actually Matters
A dip in the hose doesn’t just slow things down. It hides waste. Water and solids settle into that low spot and sit there, quietly, until you disconnect the hose and it all comes rushing out at once.
Think of it like a marble rolling across an uneven floor. Drop it on a flat surface and it stops wherever gravity gives up. That’s exactly what happens to waste in a hose with even a small uphill kink.
That’s the marble analogy Good Sam uses to explain why a continuous downhill slope is the real fix, not a workaround. The RV Industry Association’s own guidance puts a number on it: aim for roughly 1/8 inch of drop per foot of hose, which works out to about 2.5 inches of total drop across a 20-foot run. Some campers push that to 1/4 inch per foot on rougher sites for extra margin.
Beyond hygiene, there’s a practical enforcement angle too. Plenty of campgrounds actively discourage hoses lying flat on the ground, partly for appearance and partly because an unsupported hose is more likely to pop loose from the inlet under pressure. A supported, sealed run keeps both your neighbors and the campground host happy.
How Do You Set Up A Downhill Sewer Hose Run?
Getting this right at the site takes maybe ten extra minutes compared to just tossing the hose on the ground. Those ten minutes are the difference between a clean dump and a mess you’ll be thinking about for the rest of the trip.
Start with a quick site check. Look at the distance and the height difference between your RV’s outlet and the dump inlet, confirm your hose is long enough without excess coil, and gather your gear: a clear elbow or sealed donut, disposable gloves, a sewer wrench, and end caps.
- Attach the hose to the RV outlet first, before you do anything at the inlet.
- Place your first support directly under the outlet, set at its tallest height.
- Add supports every 5 to 6 feet as you work toward the dump inlet, stepping each one down slightly to maintain a steady pitch.
- Seat the clear elbow or donut into the dump inlet and check for a snug seal.
- Open the black tank valve first and watch the clear elbow to confirm flow is steady and moving away from you, not pooling.
- Close the black valve, then open the gray tank to rinse the hose clean.
- Disconnect at the dump end first, cap both ends, and store the hose.
If your site is too tight for a clean run, don’t force it. Here’s what actually works when the geometry fights you:
- Shorten the run by removing extra coil rather than letting slack pile up in the middle.
- Build a step-down using leveling blocks stacked under each support.
- Add a modular extension section if the inlet is farther away than your standard hose reaches.
A properly supported hose eliminates the hidden low spots that let residual waste sit and wait for the worst possible moment to release.
One more thing that trips people up: the order of operations isn’t just tidiness, it’s safety. Attaching at the RV first means you’re not standing over an open connection while you fumble with fittings. Watching the clear elbow during the black-tank dump lets you catch a slow flow before it backs up. And removing the hose at the dump end first means any residual drips land at the dump station, not on your campsite.
Which Hose Supports Actually Hold A Slope On Rough Ground?
Not every support handles uneven terrain the same way, and this is where a lot of RVers waste money on gear that looks solid in a parking lot demo but folds flat under real conditions.
Accordion-style or telescoping ramps are the most common option. They cradle the hose and adjust in height, folding flat for storage between trips. Their weak spot is stability on soft or sloped ground, where a narrow base can tip.

Rigid troughs, built from vinyl gutter sections or PVC half-pipe, give you a fixed, dependable channel. They’re excellent for consistently uneven sites but bulkier to pack.
Tension-line supports, like the design behind Rvlevitator’s sewer hose supports, suspend the hose above the ground entirely using a taut line rather than resting weight on individual stands. That matters on gravel, sand, or sloped grass, where a nesting stand can sink or lean.
On uneven ground, the support that fails first is usually the one with the smallest footprint touching the dirt.
A few gear notes worth locking in:
- Stick with a 3 inch diameter hose; 10 to 20 feet covers most campsite pedestal distances.
- Always carry a clear elbow, bayonet fittings, end caps, gloves, a sewer wrench, and a couple of leveling blocks.
- Prioritize supports with adjustable height, a wide stable base, and a universal fit for standard bayonet connectors.
Why Won’t My Sewer Hose Drain Downhill?
If flow slows to a trickle or stops entirely, you’re almost always looking at a trap, not a tank problem. Water pooling visibly in a clear section of hose, or a weak stream at the clear elbow, both point to a low spot somewhere along the run.
Work through these fixes in order:
- Check every support along the hose. One missing or collapsed support is often the entire problem.
- Shorten or straighten the hose if there’s excess length coiled anywhere in the middle.
- Add leveling blocks under low supports to restore a steady pitch.
- Reroute around obstacles like tree roots or drainage grates instead of running the hose over them.
- Reach for a macerator pump only as a genuine last resort when the inlet sits higher than gravity can overcome.
Before you assume the tank itself is at fault, double check valve positions, look for a kinked fitting at either end, and compare your outlet height to the inlet height. Nine times out of ten, the fix is in the hose geometry, not the RV’s plumbing.
Keeping Your Setup Reliable Trip After Trip
A hose that drains perfectly this weekend can fail next month if you skip basic upkeep. After every dump, rinse with gray water until the clear elbow runs clean, then let the hose air dry before storing it.
- Cap both ends before packing the hose away, and keep it separate from your fresh-water gear to avoid any cross-contamination.
- In cold weather, drain the hose completely. A trapped puddle that freezes can expand and split the hose wall.
- Store hoses in a UV-resistant sleeve or cover to keep sunlight from turning the vinyl brittle.
- Inspect for pinholes, stiff or cracked sections, and pinched fittings every few trips, and replace anything showing wear.
What We’ve Learned Building Supports For Uneven Sites
We built Rvlevitator’s supports around one recurring complaint: accordion stands that work fine on a flat concrete pad and then tip over on gravel or a sloped grass site. A tension-line system solves that by not depending on a wide footprint touching uneven dirt at all.
We back every support with a money-back guarantee, because a product that can’t hold a slope on a real campsite isn’t worth your money. Try the setup on your next uneven site and see how the run holds.
Get A Setup That Holds Its Slope Every Time
Building a step-down out of leveling blocks works, but it’s slow, and it has to be rebuilt at every new site. A tension-line support system solves the same problem once, permanently, because the hose hangs from a taut line instead of resting on individual stands that can sink or tip on gravel and soft grass.

Rvlevitator’s sewer hose supports for uneven ground hold your continuous downhill pitch automatically, with adjustable height at each end and a UV-resistant sleeve that protects the hose from sun damage between trips. The fold-flat design fits back into your storage bay in seconds, and the universal fit works with standard bayonet connections, so you’re not locked into one hose brand. If you want the whole kit ready to go, check the sewer hose support kits and set your next dump up right, backed by a money-back guarantee if it doesn’t hold up on your terrain.
Frequently Asked Questions
How much slope does an RV sewer hose need?
Aim for about 1/8 inch of drop per foot, which the RV Industry Association uses as its baseline recommendation. On rougher or longer sites, some RVers increase that to 1/4 inch per foot for extra margin against sag.

How far apart should sewer hose supports be placed?
Space supports every 5 to 6 feet along the run. A standard 20-foot hose typically needs three to four supports to hold a consistent downhill pitch across uneven ground.
What order should I dump my RV tanks in?
Always dump the black tank first, then the gray tank. The gray water rinses residue out of the hose after the black tank empties, leaving a cleaner hose for storage.
What if the dump inlet is higher than my RV’s outlet?
Build a step-down using leveling blocks, a rigid gutter trough, or stacked supports to force a downhill path anyway. If the inlet truly sits too high for gravity, a macerator pump is the last-resort fix.
Which end of the sewer hose should I disconnect first?
Remove the hose from the dump inlet end first, not the RV end. This keeps any residual drips at the dump station instead of near your campsite or your RV’s outlet.
Sources
- Avoid RV Sewer Hose Mistakes: Safety, Odor, and Spill Prevention – RV Critic – Adventure with Comfort At Every Turn
- What to Do When the Campground Sewer Hookup Is Higher Than Your RV Outlet (Uphill Sewer Hose Fixes) – HAPPY CAMPERS
- It all flows downhill, right? – Good Sam Camping Blog
- RV Sewer Hose Tips – BJC RV Inspections and Repairs
- Best RV Sewer Hose Guide (2025)
Leave a Reply