
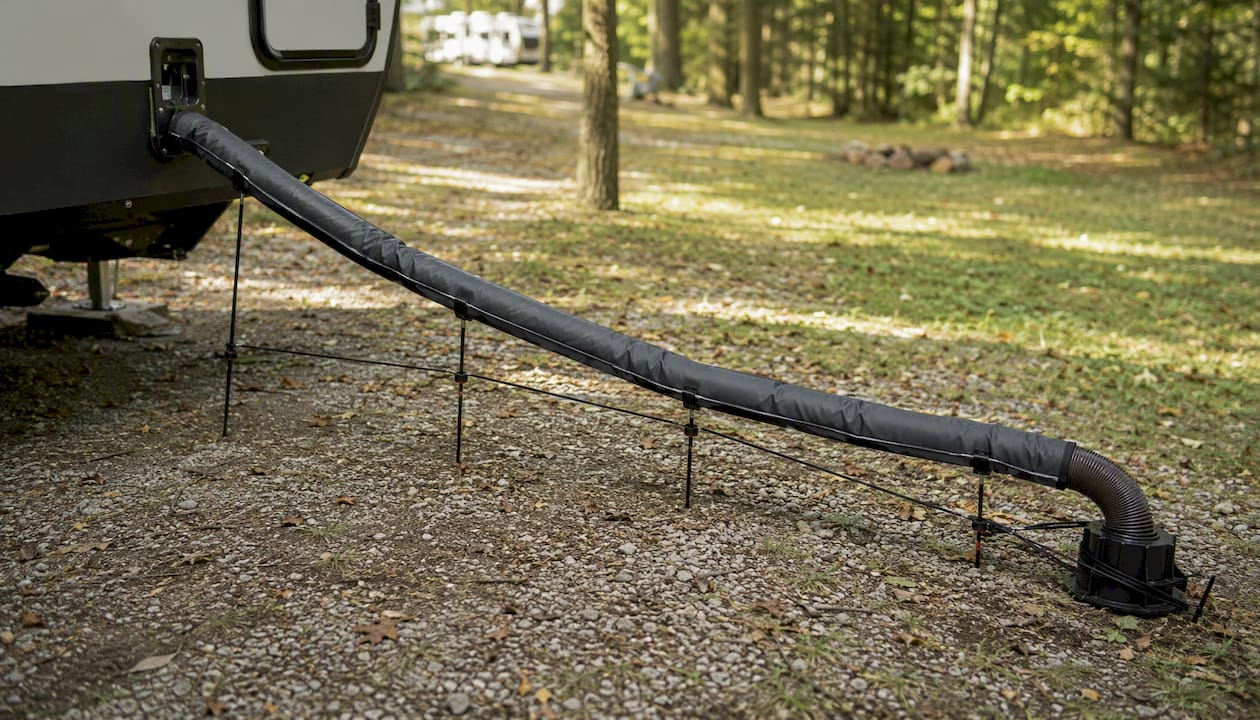
The best adjustable sewer support for uneven campsites is the Levitator from Rvlevitator. Its tension-line suspension design keeps your hose elevated above any terrain, including rocky, sloped, or uneven ground where standard cradle supports simply tip over or lose their grade.
- Works on slopes and uneven ground without tipping or losing drainage angle
- UV-resistant vinyl sleeves protect your hose from sun damage and abrasion
- Universal fit for standard 3" RV sewer hoses, with a money-back guarantee for peace of mind
TL;DR: If you drain on anything other than a perfectly flat concrete pad, the Levitator is the adjustable sewer pipe support built for your situation.
Table of Contents
- What should you look for in an adjustable sewer support?
- Why the Levitator is the top pick for uneven campsites
- Common alternatives worth knowing: Camco Sidewinder and Valterra S1500
- DIY and low-cost off-ground options: what works and what doesn’t
- How to install your support and keep it clog-free
- Quick buying checklist before you order
- Key Takeaways
- Why tension-line designs earn trust on real campsites
- The Levitator is available directly from Rvlevitator
- Useful sources and further reading
What should you look for in an adjustable sewer support?
Choosing the right support comes down to a handful of criteria that actually matter at the campsite, not just on a spec sheet.
Adjustability range. You need both vertical height adjustment and telescoping length. A support that only extends horizontally won’t help you on a site that drops two feet from your RV to the hookup. Look for a system that can handle a consistent downhill grade across the full run.
Stability on slopes. Cradle-only designs rely on flat ground to stay level. On gravel, grass, or rocky terrain, they shift. A tension-line or suspension design holds the hose in position regardless of what’s underneath it. Anchoring options, like stakes or tie-down points, add another layer of security.

Compatibility. Standard RV sewer hoses are 3" in diameter. Confirm the support’s cradle width fits that size without letting the hose creep sideways. Also check the maximum supported run length. A support rated for 15 feet won’t do the job on a 20-foot run.
Materials and durability. Plastic components are lighter and rust-proof, but cheap hinges and snap connectors wear out. UV exposure degrades plastic faster than most people expect. Look for UV-stabilized materials or included protective sleeves. Flexible hoses need protection from abrasion and UV exposure to reach their full service life, and your support system is a big part of that protection.
Ease of setup and storage. A support you leave in the truck because it’s a hassle to set up isn’t helping anyone. Prioritize systems that set up in under five minutes and pack down small enough to store in a compartment.
Warranty and price signals. A money-back guarantee tells you the manufacturer stands behind the product. A low price with no warranty often means you’re buying a one-season fix.
Red flags to avoid:
- Supports that collapse under the weight of a full, water-heavy hose
- Cradles too shallow to keep a 3" hose from rolling out
- Weak snap hinges that fail after a season of use
- No UV protection on plastic parts
Pro Tip: Measure your total hose run and the vertical drop from your RV’s outlet to the campsite hookup before you shop. That number tells you exactly what adjustability range you need.
Why the Levitator is the top pick for uneven campsites
Most sewer supports are designed for flat ground. The Levitator was designed for everything else.
The core difference is the tension-line suspension system. Instead of a rigid cradle sitting on the ground, the Levitator suspends your hose above the terrain using a tensioned line. The hose hangs in a consistent downhill arc from your RV outlet to the dump connection, regardless of rocks, roots, or slope changes underneath. That consistent grade is what prevents mid-run dips where waste can pool and cause backups.
The included UV-resistant vinyl sleeves wrap around the hose along the entire supported run. This matters because flexible hoses degrade faster under UV and abrasion than rigid pipe alternatives. The sleeves reduce direct sun exposure and protect against ground contact, extending hose life noticeably.
Installation is straightforward. You stake the support at each end, run the tension line, thread your hose through the sleeves, and connect. Most RVers complete the setup in under five minutes. The modular accessories let you adjust for longer or shorter runs without buying a completely different product.
| Spec | Levitator |
|---|---|
| Design type | Tension-line suspension |
| Hose compatibility | Standard 3" RV sewer hose |
| UV protection | Included vinyl sleeves |
| Terrain adaptability | Works on uneven, sloped, gravel, grass |
| Setup time | Under 5 minutes |
| Warranty | Money-back guarantee |
| Sold by | Rvlevitator (direct + Amazon) |
The money-back guarantee removes the purchase risk entirely. Rvlevitator also offers compensation for customer feedback, which is a genuine signal of confidence in the product.
Pro Tip: On a steep site, stake the uphill end first and tension the line toward the hookup. This keeps the hose angle consistent and prevents the mid-run sag that causes slow drainage.
Common alternatives worth knowing: Camco Sidewinder and Valterra S1500
Two products come up repeatedly in RV forums when people ask about sewer supports. They’re worth understanding, including where they work well and where they fall short.
Camco Sidewinder (CAM43041)
The Camco Sidewinder is the most commonly mentioned telescoping sewer hose support in RV communities. It uses an accordion-style plastic cradle that telescopes from a collapsed to an extended length, with the CAM43041 model reaching up to 15 feet and the 20-ft version available for longer runs (up to 20 feet for standard 3" hoses). The cradles are sloped and deep enough to hold a 3" hose without much creep, and the whole thing folds flat for storage.
Best for: RVers on relatively flat or gently graded sites who want a quick, no-tools setup.
The Sidewinder’s main limitation shows up on uneven ground. Because it’s a ground-contact cradle system, bumps or depressions underneath a section can throw off the drainage angle. Long-term forum users also note that the plastic hinges wear out over several seasons, especially with repeated folding and unfolding in cold weather.
Valterra S1500 (Slunky/EZ style)
The Valterra S1500 is a coiled, spring-like support that holds the hose in a consistent arc. It’s sturdy, simple, and popular with RVers who want something that just works without much fuss.
Best for: Shorter runs on moderately level sites where you want a durable, low-maintenance option.
The S1500 doesn’t telescope or adjust for significant slope changes. On a site with a meaningful grade, you’ll need to prop sections manually, which defeats the purpose of a dedicated support.
When a cradle-style support is enough:
- Your site is flat or has a very gentle, consistent slope
- You’re doing a short run (under 20 feet)
- You prioritize the lowest possible price and don’t mind replacing parts every few seasons
When your site has real terrain variation, a suspension design handles what cradle systems can’t. RV community threads consistently show that adjustability and keeping the hose off the ground are the two factors RVers care about most.
DIY and low-cost off-ground options: what works and what doesn’t
Some RVers build their own supports, and a few DIY approaches genuinely work for temporary or budget setups. Here’s what’s practical and what to watch out for.
Common DIY materials:
- Vinyl rain gutter sections (cut to length, propped on rebar stakes)
- PVC pipe with notched cradle sections
- Rebar or steel stakes with zip ties to hold the hose
- Paracord or rope as a basic suspension line
Three approaches that show up in forums:
-
Gutter-on-stakes: Cut vinyl rain gutters into 2–3 foot sections, drive rebar stakes at each end, and rest the gutter sections on the stakes at a slight downhill angle. This works on flat ground and costs very little. The problem is that it doesn’t adapt to uneven terrain, and the sections shift overnight.
-
PVC cradle run: Build a series of PVC T-joints or notched pipe sections at graduated heights to create a sloped run. More stable than gutters, but it takes real time to build and transport.
-
Rope suspension: Run a paracord line between two anchor points (trees, stakes, the RV frame) and hang the hose from it with zip ties. This is the closest DIY equivalent to a tension-line design and works reasonably well on sloped sites as a temporary fix.
Safety and sanitation notes. Any DIY support must maintain a continuous downhill slope. A mid-run low point lets waste pool, which creates pressure, odor, and potential backflow. Secure every section against movement so the hose doesn’t shift and create a trip hazard at night. Clean any reused materials thoroughly before contact with your sewer hose.
DIY builds are a reasonable short-term fix on a flat site. On rocky, sloped, or highly uneven ground, forum discussions across iRV2 and similar communities show that improvised setups tend to fail at the worst moments. A purpose-built adjustable support handles those conditions more reliably.
Note: This article covers general setup guidance. For specific product specs and current pricing, always check the manufacturer’s page directly.
How to install your support and keep it clog-free
A good support only works if it’s set up correctly. These steps apply to any adjustable sewer pipe support, with notes specific to suspension-style systems.
Installation checklist:
- Walk the full hose run from your RV outlet to the campsite hookup. Note any high or low spots.
- Set your anchor points at each end. For tension-line systems, this means driving stakes firmly into the ground.
- Run the tension line or extend the cradle sections from the RV end toward the hookup, maintaining a consistent downhill angle throughout.
- Thread your hose through the support sleeves or cradles before connecting either end.
- Connect the RV end first, then route to the hookup. Check that there are no mid-run dips.
- Tug the hose gently at the midpoint. It should hold its position without sagging.
Maintenance schedule:
- After each trip: inspect sleeves and cradles for abrasion wear or UV cracking
- Monthly (for full-timers): check swivel fittings and clamps for tightness
- Seasonally: clean the support components with a mild soap solution and rinse thoroughly
- Replace UV-damaged sleeves before they crack through to the hose surface
Troubleshooting common problems:
- Hose creep: Cradles too shallow or too wide let the hose shift sideways. Tighten the tension line or add a zip tie at the midpoint.
- Mid-run dip: Usually means a stake shifted or the ground settled. Re-tension and re-stake.
- Slow drainage: Check for a low point in the run. Even a small dip traps solids. Re-establish the downhill grade.
- Odor at connections: Swivel fittings that aren’t fully seated let gas escape. Reseat and tighten.
Pro Tip: Run a full flush of clean water through the hose at the end of each stay. It clears residue from the hose walls and lets you spot any drainage slowdowns before they become clogs.
Reviewing common RV sewer support setup mistakes before your first install can save you a lot of troubleshooting time on-site.
Quick buying checklist before you order
Run through these before you click “buy.”
- Check the retailer’s return policy — Amazon and direct-from-manufacturer purchases usually have the clearest return paths.
Key Takeaways
The best adjustable sewer support for uneven campsites is a tension-line suspension system that maintains a consistent downhill grade regardless of what the ground underneath looks like.
| Point | Details |
|---|---|
| Tension-line design wins on uneven ground | Suspension systems hold a consistent drainage angle where cradle supports tip or lose grade. |
| UV and abrasion protection extend hose life | Included sleeves reduce the two main failure modes for flexible sewer hoses: sun damage and ground contact. |
| Measure before you buy | Know your total run length and vertical drop so you pick a support that actually covers your site. |
| Cradle supports work on flat sites | Accordion-style telescoping supports like the Sidewinder are practical on level ground but struggle with real terrain variation. |
| Rvlevitator Levitator | The Levitator’s tension-line design, UV-resistant sleeves, and money-back guarantee make it the recommended pick for sloped and uneven campsites. |
Why tension-line designs earn trust on real campsites
Cradle supports are fine on a flat concrete pad. The problem is that most campsites aren’t flat concrete pads. They’re gravel, grass, dirt, or a combination of all three, and the ground shifts overnight when temperatures drop or after rain.
What consistently happens with cradle-only designs on uneven terrain is that one section loses contact with the ground, the hose sags into a low point, and drainage slows. You don’t notice it until you’re dealing with a backup or a smell that follows you to the next site.
A tension-line design sidesteps that entirely. The hose hangs between two fixed anchor points, so the drainage angle is set by the line tension, not by whatever the ground happens to be doing underneath. On a rocky site with a two-foot drop from the RV to the hookup, that difference is the gap between a clean drain and a problem.
The Levitator’s approach is the most practical version of this concept available for RV owners right now. The included sleeves add protection that cradle systems don’t offer, and the modular design means you’re not locked into one run length.

The Levitator is available directly from Rvlevitator
You’ve done the research. The Levitator handles what flat-ground supports can’t, and it comes with the UV-resistant sleeves, modular accessories, and money-back guarantee that make it worth the investment.

Pick up the Levitator directly from the Rvlevitator product page or browse the full sewer hose support kit collection if you want bundled accessories. The money-back guarantee means you can try it on your next trip with no financial risk. If it doesn’t solve your drainage problem on uneven ground, you get your money back. Customer service is available through the Rvlevitator website for any questions before or after purchase.
Useful sources and further reading
These are the most reliable sources for product specs, forum consensus, and technical background on RV sewer hose supports.
- Camco Sidewinder RV Sewer Hose Support CAM43041
- Best sewer hose support? : r/RVLiving
- Best sewer hose support? — iRV2 Forums
- Hose And Couplings Vs Rigid Tube For Hydraulics
- Flexible Hose vs Rigid Pipe: Best Industrial Choice In 2026
- The Best RV Sewer Hose Support Based on Customer Reviews and Ease of Use
- What kind of sewer hose support is best? — Forest River Forums
- RV Sewer Hose Support for Any Terrain | The Levitator
Leave a Reply